
Snow Peak Ward Bishopric Disaster Preparedness Challenge for December 2016: Winter Preparedness Checklist
By Cynthia Ewer, Author of Cut the Clutter: A Simple Organization Plan for a Clean and Tidy Home
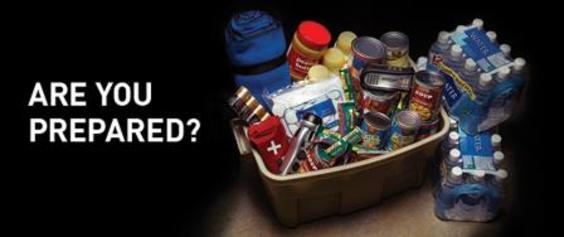
When wintry weather blows, will your family be prepared? Winter brings special seasonal challenges to an organized home. Winter storms can make navigating roads and walkways hazardous; power outages and snow days highlight any family's readiness for cold weather. Take time now to review your family's emergency preparedness with this Winter Preparedness Checklist. It'll help you prepare your home and automobile for cold-weather hazards.
The Lord is forgiving, but sometimes life is not forgiving.
Gordon B. Hinckley
When You Are Out and About
Will your home welcome winter visitors safely? Get ready for snow, ice or rain on walks and driveways by stocking up on these cold-weather basics.
• Snow shovel
•De-icing compound
•Waterproof floor mats
Inside Your Home
Household emergency supplies should include enough food, water and supplies to last four days without power or help. Check your home emergency kit against this basic checklist.
•Food that doesn't require heating or refrigeration, such as canned meats, soups and stews, cereal, and energy bars
•Manual can opener
•Paper plates, cups and plastic utensils
•1 gallon of water per person per day (see Snow Peak Bishopric Challenge for April 2016 below for details on water)
•Flashlights and batteries
•Battery-powered radio
•Battery-powered clock
•Cellular phone
•First-aid kit
•Four-day supply of prescription medicines
•Blanket and cold-weather clothing for each family member
•Pet food and additional water for household pets
When You Are On the Road:
Winter transportation can mean coping with ice, snow, and hazardous roads. Road conditions can change in an instant.
Before traveling, give cars a winter preparedness exam.
•Check antifreeze
•Check and replace older batteries
•Remember to keep the gas tank near full to avoid freezing water in the fuel line
•Check tires and spare tire for proper inflation
Make sure automobiles contain the following emergency supplies to handle winter road hazards.
•Bag of sand, road salt or non-clumping cat litter. The bag's extra weight means better traction, and the contents can be spread under slipping tires.
•Ice scraper
•Jumper cables
•Small shovel (to dig snow away from wheels, or scatter sand on roadway)
•Tire chains (every driver should practice putting them on)
•Flares or reflective triangle to warn other motorists if you break down
•Blanket
•Flashlight and batteries
•Gallon jug of drinking water
•First aid kit
•When traveling by car, include emergency food and clothing for each traveler.
Pack supplies in an easy-to-carry emergency backpack in case you need to abandon your car. Your emergency backpack should include these preparedness items.
•Jacket, hat, gloves and sturdy, snow-proof boots for each traveler
•Nonperishable food
•Bottled water
•Cellular phone
•Money
Snow Peak Ward Bishopric Disaster Preparedness Challenge for November 2016: "A prudent man foresees the difficulties ahead and prepares for them; the simpleton goes blindly on and suffers the consequences." - Proverbs 22:3
(I hope none of us ever need this information, but read it, print it, keep it, know it, just in case. Lot's of really informative reading at the links below. Start with them in order, and especially read the first two. I was pleasantly surprised to learn that it is more optimistic than most assume, IF you know what to do).
1. The good news about nuclear destruction:
2. What to do if a nuclear disaster is imminent:
3. Fallout shelters and Nuclear Civil defense (part 1):
(part 2):
(part 3):
4. When an ill wind blows from afar: (note the 2nd half about protecting farms and livestock)
Snow Peak Ward Bishopric Disaster Preparedness Challenge for October 2016 Is: Making your own DYI Water Filtration Kit. (Click Here)
Snow Peak Ward Bishopric Disaster Preparedness Challenge for September 2016 Is: National Preparedness Month
September is recognized as National Preparedness Month (NPM) which serves as a reminder that we all must take action to prepare, now and throughout the year, for the types of emergencies that could affect us where we live, work, and also where we visit. Due to the success of last year’s theme, “Don’t Wait, Communicate. Make Your Emergency Plan Today,” will be returning for this September with a continuing emphasis on preparedness for youth, older adults, and people with disabilities and others with access and functional needs. Thank you for taking time help make America more prepared for emergencies. Just click the link below and get started!
Snow Peak Ward Bishopric Disaster Preparedness Challenge for August 2016 Is Preparing Children To Cope With Their Feelings In A Disaster.
Getting children mentally and emotionally prepared for a disaster is just as important as storing supplies and equipment. It is important to warn children, without overly alarming them, about disasters. Tell children that a disaster is something that could hurt people or cause damage. Explain that nature sometimes provides “too much of a good thing” – fire, rain, or wind. Talk about things that could happen during a storm, like the fact that the lights or phone might not work. Tell children there are many people who can help them during a disaster, so that they will not be afraid of firemen, policemen, paramedics, or other emergency officials.
Teach children:
How to call for help.
When to use emergency numbers.
To call the family contact if they are separated.
The most important role a parent can play in an emergency situation is to stay calm. Children of all ages can easily pick up on their parents’ fears and anxieties. In a disaster, they’ll look to you for help and for clues on how to act. If you react with alarm, a child may become more scared. If you seem overcome with a sense of loss, a child may feel their losses more strongly. Experts agree that you should be honest with your children and explain what’s going on. Just be sure to base the amount of information and level of detail on what’s appropriate for their age level. Children depend on daily routines: They wake up, eat breakfast, go to school, and play with friends. When emergencies or disasters interrupt this routine, children may become anxious; not want parents out of their sight/refuse to go to school or child care; or feel guilty that they caused the disaster by something they said or did. Children’s fears also may stem from their imagination, and you should take these feelings seriously. Your words and actions can provide reassurance. When talking with your child, be sure to present a realistic picture that is both honest and manageable.
Be aware that after a disaster, children are most afraid that:
The event will happen again.
Someone will be injured or killed
They will be separated from the family
They will be left alone
Children may be upset over the loss of a favorite toy, blanket, teddy bear or other items; undergo a personality change–from being quiet, obedient and caring to loud, noisy and aggressive or from outgoing to shy and afraid; have nightmares or be afraid to sleep alone or with the light off; become easily upset, cry or whine; lose trust in adults because the adults in their life were unable to control the disaster; or revert to younger behavior such as bedwetting and thumb sucking.
Parents should remember that the psychological effects of a natural disaster don’t go away once the emergency has passed. Children can suffer from nightmares or other problems for years after a disaster. Children are better able to cope with a traumatic event if parents, teachers and other adults support and help them with their experiences.
Help should start as soon as possible after the event. Some children may never show distress because they don’t feel upset, while others may not give evidence of being upset for several weeks or even months. Even if children do not show a change in behavior, they may still need your help. Parents should be on the lookout for signs that their kids need some extra counseling.
To help children cope talk with them different than others. Let children take their time to figure things out and to have their feelings. Don’t rush them or pretend that they don’t think or feel as they do.
Suggested Ways To Reduce a Child's Fear And Anxiety
Keep the family together as much as possible. While you look for housing and assistance, try to keep the family together and make children a part of what you are doing. Otherwise, children could get anxious and worry that their parents won’t return.
Calmly and firmly explain the situation. As best as you can, tell children what you know about the disaster. Explain what will happen next. For example, say, “Tonight, we will all stay together in the shelter.” Get down to the child’s eye level and talk to them.
Encourage children to talk. Let them talk about the disaster and ask questions as much as they want. Encourage children to describe what they’re feeling. Help them learn to use words that express their feelings, such as happy, sad, angry, mad and scared. Just be sure the words fit their feelings–not yours.
Listen to what they say. If possible, include the entire family in the discussion. Reassure them that the disaster was not their fault in any way. Assure fearful children that you will be there to take care of them. Children should not be expected to be brave or tough, or to “not cry.” Include children in recovery activities. Give children chores that are their responsibility. This will help children feel they are part of the recovery. Having a tasks help children feel empowered and give them a way to feel in control and useful.
Go back as soon as possible to former routines. Maintain a regular schedule for children.
Let them have some control, such as choosing what outfit to wear or what meal to have for dinner. Allow special privileges such as leaving the light on when they sleep for a period of time after the disaster. Find ways to emphasize to the children that you love them.
Once you arrive at a shelter, hotel, or a relative’s home, disaster related TV programs should be restricted. News coverage of disasters—especially if children see their own town or school on TV–can be traumatic to children of all ages. If children watch TV coverage of the disaster, parents should watch with them and talk about it afterwards. Consider turning off the TV.
Let's Review How to Get Your Family Ready Before a Disaster
It’s important for all family members to know how to react in an emergency, because when a disaster strikes, you may need to act quickly. Discuss possible disaster plans with your children–in a very general way–so that they will know what to do in various situations. For example, if you live in a part of the country that is prone to tornadoes, it is important for your children to know what to do if a tornado is coming. Remember that it is possible that you and your children may be in different places when a disaster strikes; for example, at school and work. Also, older children may be home alone when faced with an emergency.
Create a Family Disaster Plan
You can create a Family Disaster Plan by taking some simple steps. It’s important for all family members to know how to react in an emergency because the best protection is knowing what to do.
Talk with your children about the dangers of disasters that are likely in your area and how to prepare for each type. Make sure they know where to go in your home to stay safe during an earthquake, tornado, hurricane, or other disasters likely for your area.
Teach your child how to recognize danger signals. Make sure your child knows what smoke detectors, fire alarms and local community warning systems (horns, sirens) sound like and what to do when they hear them. Explain to children how and when to call for help. Keep emergency phone numbers (your local Emergency Phone Number List) where family members can find them.
Pick an out-of-state family contact person who family members can “check-in” with if you are separated during an emergency. For children who are old enough help them to memorize the person’s name and phone number, or give them a copy of the emergency list included in the kit. Agree on a meeting place away from your home (a neighbor or relative’s house or even a street corner) where you would get together if you were separated in an emergency. Give each family member an emergency list with the name, address and phone number of the meeting place. For children who are old enough help them to memorize the person’s name, address and phone number.
Put together a disaster supplies kit for your family.
Practice your Family Disaster Plan every six months so that everyone will remember what to do when in an emergency.
It's important for all family members to know how to react in an emergency because the best protection is knowing what to do.
Kids Get Ready Kit
Assemble a special "Get Ready Kit: for kids. Explain to your children that you might need to leave your house during a disaster and sleep somewhere else for a while.
Here are some items you can your children could put into a backpack or container so it will be ready if needed:
A few favorite books, crayons, and paper.
Favorite small toys like dolls or action figures.
A board game.
A desk of cards.
A puzzle.
A favorite stuffed animal.
A favorite blanket or pillow.
A picture of your family and pets.
A box with special treasures that will help you feel safe.
Pets
Most shelters can’t take pets, so plan what to do in case you have to evacuate. Call your local Humane Society to ask if there is an animal shelter in your area. Prepare a list of kennels and veterinarians who could shelter them in an emergency. Keep a list of “pet friendly” motels outside your area.
Disaster Supplies
Every family should have disaster supplies in their home. Needed supplies include food, water and other things that you might need in an emergency. In a hurricane, earthquake, or flood, you could be without electricity for a week or more, or the water supply may be polluted. There also may be times, such as during a flood or a heavy winter storm, that you might not be able to leave your house for a few days. Your family may never need to use your disaster supplies, but it’s always best to be prepared. To make getting these items fun, you could have a family “Scavenger Hunt” and have family members see how many of these items they can find in your home.
Bishopric Challenge for the Month of July 2016 is: Maintaining Smoke Alarms and Fire Extinguishers to Help Prevent a Disaster.
Maintaining Your Smoke Alarms and Fire Extinguishers
REMEMBER...............Only working smoke alarms save lives
Test your smoke alarm every month to ensure the battery and the alarm sounder are operating. Hold down the test button until you hear a loud alert tone, then release. Use a broom handle if you cannot reach, but be careful you do not damage the smoke alarm. You may need to press the button again to turn off the alarm.
• Vacuum your smoke alarm with a soft brush attachment around the smoke alarm vents every 6 months. This will remove any build-up of dust and cobwebs. Use a surface insect spray around the smoke alarm to prevent insects from nesting inside it. Ensure you cover the smoke alarm while you spray to ensure you do not spray inside the smoke alarm. Never paint over or cover your smoke alarms. Your smoke alarm battery may need to be replaced every year. Smoke alarms with a non-replaceable battery may carry a warning that the battery is not replaceable. Always check the manufacturers instructions before replacing the battery. Replace your smoke alarms every 10 years or according to manufacturers instructions.
Did you know…?
Most smoke alarms make a warning ‘beep’ or ‘chirp’ when there is a fault or when the battery is low. Before changing the battery, check with the manufacturer’s instructions. The chirp may also indicate the smoke alarm has become contaminated. If after changing the battery the smoke alarm continues to sound a warning ‘beep’ or ‘chirp’, the smoke alarm may be faulty and require replacement.
A licensed electrical contractor may be required to disconnect or install electrically powered smoke alarms. All other smoke alarm maintenance can be done by an adult.
Electrically powered smoke alarms may give a low battery warning after periods of extended power outages. You should be aware that rechargeable batteries may need a few days to recharge after power is restored. If your smoke alarm does not have a rechargeable battery you will need to replace the battery periodically. Check with your manufacturer if you need to replace the battery or if the unit will recharge.
In the event of a fire
Crawl low under smoke. Assist or alert any people in danger, but only if it is safe to do so. Help your pets to safety if it is safe to do so and only if here is time. Many will escape through the same openings you escape through. Go to your safe meeting place, such as a trusted neighbor. Call 911. Wait for firefighters to arrive.
Exit Drills
Plan an escape route from every room in the house. Family members should get out first and then phone the fire department from a neighbor's house.Hold regular family drills to make sure everyone knows how to get out of the house in case of fire. This is
Practice the exit plan so that everyone can do it in the dark. Set up a specific spot away from the house, such as outside a neighbor's home, where the family should assemble after escaping the fire. Be sure to include this step in your family fire drills. If you live in an apartment building, use the stairways to leave the building. Do not use the elevator.
Go down stairs backward on hands and knees. Smoke rises, so the two feet nearest the floor contain the freshest air and the best visibility. Never run back into a burning house. Emphasize this point during your family fire drills. Value your life above your possessions. Get out of the house as quickly as possible rather than taking time
to rescue items.
People who wear prescription eyeglasses or dentures should keep these items near their bed for easy retrieval before leaving the house during a fire.
Tips to help fireproof your home
Keep in mind that most fire deaths are caused by smoke inhalation. The importance of smoke detectors cannot be overemphasized. In recent years, roughly three-fifths of home fire deaths have occurred in homes without smoke detectors.
Put a smoke detector outside every bedroom (more than half of all fatal home fires happen at night) and on every level of the house, including the basement. If you have hearing-impaired individuals in your home, place an additional alarm with a signaling light inside the bedroom as well. Make sure the detector carries the label of an independent inspecting agency. Test your smoke alarms once a month to make sure they are functioning correctly. All smoke detectors designed for home use in the United States have a button or tab on the outside of the detector for testing detector operation. Check the manual for details. Change the smoke-alarm batteries regularly. Some experts recommend doing this twice a year on the days that daylight-saving time changes.
Don't install a smoke detector near a window, door or forced-air register where drafts could interfere with the detector's operation.
Never paint a smoke detector and never "borrow" batteries from the smoke detector for another use.
Electricity
Turn off all electrical appliances as soon as you've used them. Before you leave the house, check to make sure everything is turned off. Use surge protectors whenever several devices are plugged into a single wall socket, especially energy-eaters like computers, color televisions, stereos and cordless phones. In addition to preventing damage to electrical equipment, surge protectors keep circuits and appliances from becoming suddenly overloaded. Overloaded circuits and cords may cause fires.
Read the label on extension cords to make sure you've got the right cord for your needs. The cord should be able to handle the voltage of your appliances. Check labels to be sure how much voltage it can take. Too much current going through a too-small cord can damage the cord and start a fire. Make sure your electrical system is up to code and able to pass a city inspection. If your house was built before the '50s you should have it inspected. To determine when your electrical system was last inspected, check the
door and cover of your electrical panel(s). Do not remove this panel. The panel should contain a label or tag with a date of the last inspection and a signature or initials.
If your fuses and circuit breakers blow frequently, you probably need to update your electrical system. The wiring in old houses can't always cope with the heavy electrical demands of modern households. An electrician can install circuits to accommodate computers, washer and dryers, internal vacuum systems, kitchen appliances
and other heavy users of electricity. If you are renting a house or apartment with an outdated or unsafe electrical system, ask the landlord to update the circuitry. Generally, property owners are eager to protect their investment and will do this willingly. However,
if the landlord balks, remind him or her that, by law, the property must be up to code.
Fire Extinguishers
Keep a multi-purpose dry chemical fire extinguisher on each floor of the house in an easily accessible spot. Though there are specialized extinguishers for different types of fires, it's less complicated to have multi-purpose extinguishers that work well on wood, grease, flammable liquid and electrical fires. It's especially important to have a fire extinguisher in the basement where furnaces and water heaters are located. Read the instruction manual so you know how to use the fire extinguishers. Make sure everyone in the house knows when and how to use them. Keep a fire extinguisher in your vehicle. Even minor accidents can cause car fires. Inspect your fire extinguishers monthly. Check to make sure that each extinguisher is easy to get to, has instructions facing toward the user, is full (lift and feel the weight), has no physical damage or obvious leaks, has intact tamper indicators, and has the pressure gauge in the operable position.
Fireplaces and Heating Units
Clean and inspect fireplaces on a regular basis. Keep flues clean, including those on fireplaces, furnaces and water heaters. Not only does this reduce fire danger, it helps prevent release of carbon monoxide into the house. Do not use hibachis or other non-electrical portable heating units indoors unless they are specifically manufactured for that purpose. Carbon Monoxide poisoning is silent, swift and DEADLY! It takes seconds to check your smoke alarm. Fire can disrupt lives forever. Remember to ALWAYS turn off space heaters when you leave the room.
Snow Peak Ward Bishopric Disaster Preparedness Challenge for June 2016 is Sanitation Kits in case of an emergency or disaster.
Emergency sanitation and hygiene is one of 10 basic emergency needs in an emergency or disaster. Emergency toilets, sanitation kits, and hygiene kits can help you meet your needs in a crisis. Whether, you need to evacuate or shelter in place, there are emergency toilets, sanitation kits, and personal hygiene kits to meet your needs. Improper sanitation practices causes even more danger than an actual natural disaster being followed in the aftermath of the emergency situation. Improper sanitation promotes rapid spread of disease and many other illnesses. Cleanliness is vital in emergencies.
Here is just an example of what you will need to construct your sanitation kits. Feel free to alter the design to fit your family needs.
Buckets
You’ll need one 6-gallon with lid and one 2 ½-gallon bucket. During the disaster, the large bucket will be your emergency potty and the smaller one will be used for sponge baths and other general cleaning. Attach an Emergency Potty Seat to the larger bucket. The 6-gallon bucket is the same height as the modern, chair-height toilets. It’s more comfortable for the elderly and disabled but you could just as easily use a 5-gallon bucket and sit a bit lower. The smaller bucket fits neatly inside the larger, along with everything listed below. Into the buckets, put:
Emergency Sanitation
A cheap plastic shower curtain, shower rings and line to make a simple privacy enclosure for your potty. 12-gallon trash bags: used to line the bucket when doing your business. A folding shovel to bury waste until you are able to dispose of it properly. A lighter to burn waste if you are unable to bury it. Toilet paper and Scott’s Shop Towels. Hubby convinced me that shop towels were thirstier than regular paper towels and they’re reusable. I used my vacuum food sealer to suck the air from the rolls, saving space in my bucket.
General Cleaning
Pool Shock and an eyedropper. Bleach looses its strength in long term storage and is bulky. A small amount of Shock, mixed with water will make fresh bleach. Find it in the pool section. Tide detergent: for washing clothes. Dishwashing detergent for general cleaning. Add 33-gallon trash bags with twisties for other general trash. Again, the vacuum sealer sucked the air from the plastic bags, saving space in the bucket.
Personal Protection
Gloves: the long-cuff latex type is best, if you’re not allergic. Safety glasses. Several N95 masks. Don’t under estimate the need for personal protection (gloves, mask and eye). If someone in your family becomes ill, you’ll need to protect yourself. In a disaster situation you may be cleaning up urine, diarrhea, blood or who-knows-what. If space permits, add N100 masks. N100 blocks all of the germs and odors plus, the small ventilator makes it more comfortable to wear, they are relatively cheap and can be found a your local Wal-Mart stores.
Personal Hygiene and Body Care
Toothbrush, paste, mouthwash and floss. Deodorant. Bar soap. Shampoo. Face cloth and camp towel. Baby wipes as an alternative when water is scarce. Chap stick. Lotion. Powder. Bug spray. Sunblock. Razor and shaving cream. To fit it all in the bucket, stick to small or travel sizes. Feminine hygiene supplies. Scrunchies: if you don't know what these are just ask your wife/daughter. Nail file and clippers. Multi-vitamins.
A quick and effective camp shower: this is one of those black bags that you hang in the sun. It works pretty well specially if you use it with the shower curtain. A knee-high stocking: makes a convenient soap-on-a-rope that can be tied nearby.
Poly Tarp
Make a floor for your shower. Don’t waste shower water, you might be able to reuse it elsewhere. Many items have multiple uses, as an example the shower curtain and tarp can be used to catch rain water.
Don’t underestimate the need for pleasant smells after a disaster. But also, don’t buy products with overbearing scents that conflict with one another. Keep smells light and fresh.
Here are some suggestions to keep your sanitation process as germ free as possible.
Medaphene Plus Disinfectant Aerosol Spray is an effective disinfectant controls the growth of many disease-causing organisms. Formula is bactericidal, tuberculocidal, fungicidal and veridical on hard, nonporous surfaces. Effective against multiple viruses including HIV-1 (AIDS virus), Herpes Simplex (Type 2), Avian influenza and influenza A2, Avian bronchitis, Avian laryngotracheitis, Hog cholera and pseudorabies. Also effective against bacteria including tuberculosis, staph, salmonella and pseudomonas.
Super Sorb is an instant absorbent: sprinkle a bit into the potty after use to eliminate odors, kill germs and turn liquids into a gel. You could also use kitty litter, saw dust or other items, but it is heavy and you’d have to store more of it. Find them both on Amazon, Wal-Mart, Staples, or where janitorial supplies are sold.
Aggressively vacuum seal and carefully pack anything that can be compressed and it will all fit neatly into one 6-gallon bucket. Print an inventory list and maybe instructions your family may need and toss it in as well. Put the lid on it and label the bucket. You’re done.
Snow Peak Ward Bishopric Disaster Preparedness Challenge for May 2016 was 72 hr. emergency kit for your vehicles.
EVERYONE should keep a 72-hour emergency survival kit in their vehicle. No excuses.
Why?
Because if you unexpectedly have to evacuate or get away for any reason, or if you are unable to return home, your 72-hour emergency kit will provide you with the essentials that you might need to survive for up to 3 days.
WHEN You Might Need A 72-hour Emergency Kit
Hurricane warning and you must or should evacuate.
Forest fire is threatening your neighborhood.
Earthquake damage in your region prohibiting you from returning home.
Winter snow or ice-storm has stranded you away from home.
Tornado has destroyed your neighborhood and all you have is in your car.
Breakdown while traveling in remote location.
Accident sends you over embankment where no-one see’s you – you’re trapped.
You’re out camping, hunting, fishing and simply need more food-water.
Nuclear accident, detonation, or dirty-bomb in your region.
Martial law is declared and you’re bugging out to your survival retreat.
Grid down in your city and you’re bugging out.
Economic collapse has come and you’re escaping the looting and rioting.
WHAT Food Should you Store In your 72-hour Vehicle Emergency Kit?
There are many opinions and recommendations for what to keep in a 72-hour emergency kit. Logically, there is no absolute right way. In fact, many who do have such a kit will often readjust it from time to time for the season or changing circumstances. The basic goal is to simply keep enough food, water, and basic supplies to cover a 3-day period.
How much food?
The short answer is, store approximately 6,000 calories (3-days) of food for each person who would most likely be traveling in the vehicle. Ideally you want foods that are calorie dense to save space, especially if you find yourself having to walk with a backpack.
Choose a variety of foods that do not require cooking, or those already cooked (canned).
For the vehicle, consider keeping your foods in out the extreme heat or cold. Change out your food every six months due to probable exposure to excessive temperature extremes, condensation issues, and to use good food rotation.
Food ideas…
Power-food-energy bars
Chocolate bars, hard candy (quick energy)
Canned beef stew, Spam, Spaghetti-os, Ravioli, Chili, etc.)
Peanut Butter
Beef Jerky snacks
MRE’s
Dried Fruit
In addition, store 1.5 gallons of water (the minimum requirement) per person for the 3-day period, which is about 12 typical size water bottles.
Snow Peak Ward Bishopric Disaster Preparedness Challenge for April 2016 was First Aid Kits (For Home and Vehicle/s).
Disaster happens anytime and any where. And when disaster strikes, you may not have time to respond. After a disaster, local officials, first responders and church leaders will be on scene but they will not be able to reach everyone immediately. You could get help in hours or it may take days or longer for help to arrive. If a disaster struck right now would your family be prepared to cope with the emergency until help arrives?
Our Bishopric has issued us a new challenge for the Month of April. Their challenge is for every family in the Snow Peak Ward to assemble a first aid kit. They know our families will cope best in case of a disaster by preparing for a disaster before it strikes and that once it strikes there won't have time to shop for or search for supplies. Gathering supplies in advance will enable your family to endure an evacuation or shelter in place until help arrives. Here is a suggested guideline for assembling a first aid kit for your home and especially your vehicles.
First aid instruction booklet
Sterile adhesive bandages in assorted sizes
2-inch sterile gauze pads (4-6)
4-inch sterile gauze pads (4-6)
Hypoallergenic adhesive tape (at least 2 rolls)
Triangular Bandages (3-4)
2-inch sterile roller bandages (3 rolls)
3-inch sterile roller bandages (3 rolls)
Scissors
Tweezers
Needles
Moistened towelettes
Antiseptics (Isopropyl Alcohol Pads, Betadine Swabs, Neosporin and Bacitration tube and packets and other antibiotic ointments)
Thermometer
Tongue suppressors (4-6)
Tube of petroleum jelly of other lubricants
Assorted sizes of safety pins
Needles
Cleansing agents (soaps)
Hypoallergenic Latex gloves (4 pairs)
Sunscreen
Compact set of scriptures
Chocolate Bars for distressed children (4-6)
Store your kit in a convenient place known to all members of your house hold. Keep a smaller version of your kit in your vehicles. Store the items in your kit in plastic ziplock bags to keep them as free as possible from air. Re-think your kit at least every year and discard items that might be out of shelf life recommendation.
Essential Non-prescription drugs for first aid kit:
Aspirin or non-Aspirin pain relievers
Anti-diarrhea medication
Antacids (for stomach upset)
Laxatives
WebMD Herbal Remedies
Just select the link below, select the herb and click on it for its use.
Snow Peak Ward Bishopric Disaster Preparedness Challenge for March 2016 was Water
Water is the top priority in a survival scenario. More than about three days without water foretells of suffering and ultimately death. An average adult loses about 800ML (Approximately 27 oz./day) . Half through the skin and half from respiration. The majority of fluid output occurs via the urine, approximately 1500 ml/day (approx 1.59 qt/day) in the normal adult resting state. Another150ml (approximately 6oz. is lost through other body wastes. The amount of water lost in normal day to day activities from the human body is approximately 2,450ml or 2.5 quarts. Food contributes 0.5 to 1 l/day, and the metabolism of protein, fat, and carbohydrates produces another 0.25 to 0.4 l/day, which means that 2 to 3 l/day of water for men and 1 to 2 l/day of water for women should be taken in as fluid, i.e. drunk, in order to meet the Recommended Daily Intake (RDI). These figures are in keeping with the 2500ml (Approximately 2.6 qts/'day) intake for normal adults to balance water loss vs. gain. Rule of thumb is to have at least one gallon of water per person per day on hand in a disaster scenario. Note: Illnesses which produce profuse sweating, diarrhea, vomiting, etc., may double or triple fluid loss.
Food grade Stainless Steel is the safest storage containers for water.
• Pros: Won't easily rupture and they won't leach harmful chemicals in the water over time.
• Cons: Expensive and heavy. Look for #304 or 18/8 food grade stainless steel. Skip anything else.
Glass is probably as safe as Stainless Steel for storing water.
• Pros: Glass won't leach harmful chemicals in the water over time.
• Cons: Extremely fragile....use with caution.
Plastic containers are for the most part safe to store water if you pay close attention to the recycle symbols stamped on the bottom. **
• Pros: Cheap, plentiful, easy to store, won't shatter if dropped, and reusable for 3-6 months before replacing.
• Cons: can leach harmful chemicals if not used properly and must be recycled at the end of their lifecycle usually about 3-6 months. Our ward leaders have counseled us to store at least one case of water per person enough for three days in a disaster situation.
** No plastics are completely safe if exposed to to long term heat such as leaving a bottle of water in a hot car on a hot summer day. The bottle may leach harmful chemicals into the water. One case (.5 Liter bottles 16 count) equals approximately 16 quarts or 4 gallons. One case per family member is enough for three or four days in a disaster situation. Note: Don't forget household pets. They need 1 gallon of water per pet for a three days supply. Call your local veterinarian for advice on large farm animals. They need water too.

A simple way to choose the safer plastics is to remember 1-2-4-5 Stay alive, 3-6-7 go to Heaven.
